We’ve enhanced targets in Steep, making them smarter and more dynamic to analyze and edit. You can now:
- Add a combination of multiple dimensions to a single target, like iOS users and US.
- Break down and compare ratio targets seamlessly.
- Add more consistency to your targets thanks to unique metric identifiers, assigned to each metric.
Learn more about the benefits of the upgrade in our release notes.
Migration steps
- Add a new target table in the updated format.
- Test your new table in Steep.
- Upgrade your workspace.
1. Add a new target table with an updated format
If you have existing targets in the old format in Steep, created before March 2025, you need to switch to the new format. We recommend you to create a new table, not to break any of your existing targets in Steep created based on the old table format.
To use the new targets format, some updates are required to your targets table.
- Replace metric name to the metric identifier. You can find the metric identifier on the about tab for your metric.
- Add dimension columns (optional) If your targets include dimensions, create one column per dimension, with the column header being the dimension identifier and the dimension values populating the rows.
- Add numerator and denominator columns (optional). They allow you to make dynamic analyses and break down your targets seamlessly.
Example: New target table format
| Series | Time | Metric | Channel | Country | Value | Numerator | Denominator |
|---|---|---|---|---|---|---|---|
| Budget 2025 | 2025-01-01 | Registrations | 1000 | ||||
| Budget 2025 | 2025-02-01 | Registrations | 1000 | ||||
| ... | ... | ... | ... | ... | ... | ... | ... |
| Budget 2025 | 2025-01-01 | Registrations | iOS | 800 | |||
| ... | ... | ... | ... | ... | ... | ... | ... |
| Budget 2025 | 2025-01-01 | Registrations | Android | 100 | |||
| ... | ... | ... | ... | ... | ... | ... | ... |
| Budget 2025 | 2025-01-01 | Registrations | US | 500 | |||
| ... | ... | ... | ... | ... | ... | ... | ... |
| Budget 2025 | 2025-01-01 | Registrations | JP | 100 | |||
| ... | ... | ... | ... | ... | ... | ... | ... |
| Budget 2025 | 2025-01-01 | Registrations | iOS | US | 300 | ||
| ... | ... | ... | ... | ... | ... | ... | ... |
| Budget 2025 | 2025-01-01 | Registrations | iOS | JP | 50 | ||
| ... | ... | ... | ... | ... | ... | ... | ... |
| Budget 2025 | 2025-01-01 | Activation | 5 | 100 | |||
| ... | ... | ... | ... | ... | ... | ... | ... |
Target table components:
| Column | Description |
|---|---|
Series | The series column can be used to set up multiple targets per metric, e.g. ”Budget”, ”Budget v2”, ”Stretch budget”, that users can switch between. |
Time | The time column specifies the start date of each period based on the time grain (for example 2025-04-01 for April on a monthly time grain, or 2025-04-04 for Week of Apr 4 on a weekly time grain). Steep automatically detects the time grain of your target series, which you can verify in the target settings page. |
Metric | The metric column is used to specify the metric and corresponds to the unique metric identifier, which can be found under the About tab in a metric, or when editing the metric. Using the metric identifier in the target setup ensures it stay consistent, even if metric names are changed. |
Dimension | The dimension column(s) is used to specify the dimension and dimension values. A metric can have multiple dimensions, and the column name must match the column name of the dimension in your database. Add the corresponding dimension values in the table. If targets are not set at the dimension level, you can exclude the dimension columns. Specify the dimension value for a metric, or a combination of dimension values. Note that you must add target values for all combinations of dimension values to get aggregations of targets in visualizations. See the example table above. |
Value | The value column represents the target value for the specific metric and applied dimensions for the specified time. |
Ratio metrics | If you are adding a target to a ratio metric you need to include numerator and denominator columns. Add the numerator and denominator that is used to generate the target value. The target ratio will automatically appear as either a number or percentage, depending on how the metric is defined. |
Ratio metrics
If you do not include a numerator and denominator column for ratio metrics, the value column will be read instead. This will limit Steep’s ability to aggregate ratio targets when filters are applied.
2. Test your new table in Steep
Once you’ve updated your target table format, you can toggle the upgrade on or off in Steep to test the upgrades, before migrating your entire workspace to the new format. The test mode is only visible to you and won’t affect anyone else in your workspace.
3. Upgrade your workspace
When you’ve taken the previous steps, you can migrate your entire workspace to the upgraded target format. Once you upgrade, the changes are launched to all users in your workspace. Please note that you can’t go back to the previous format after you confirm your upgrade. 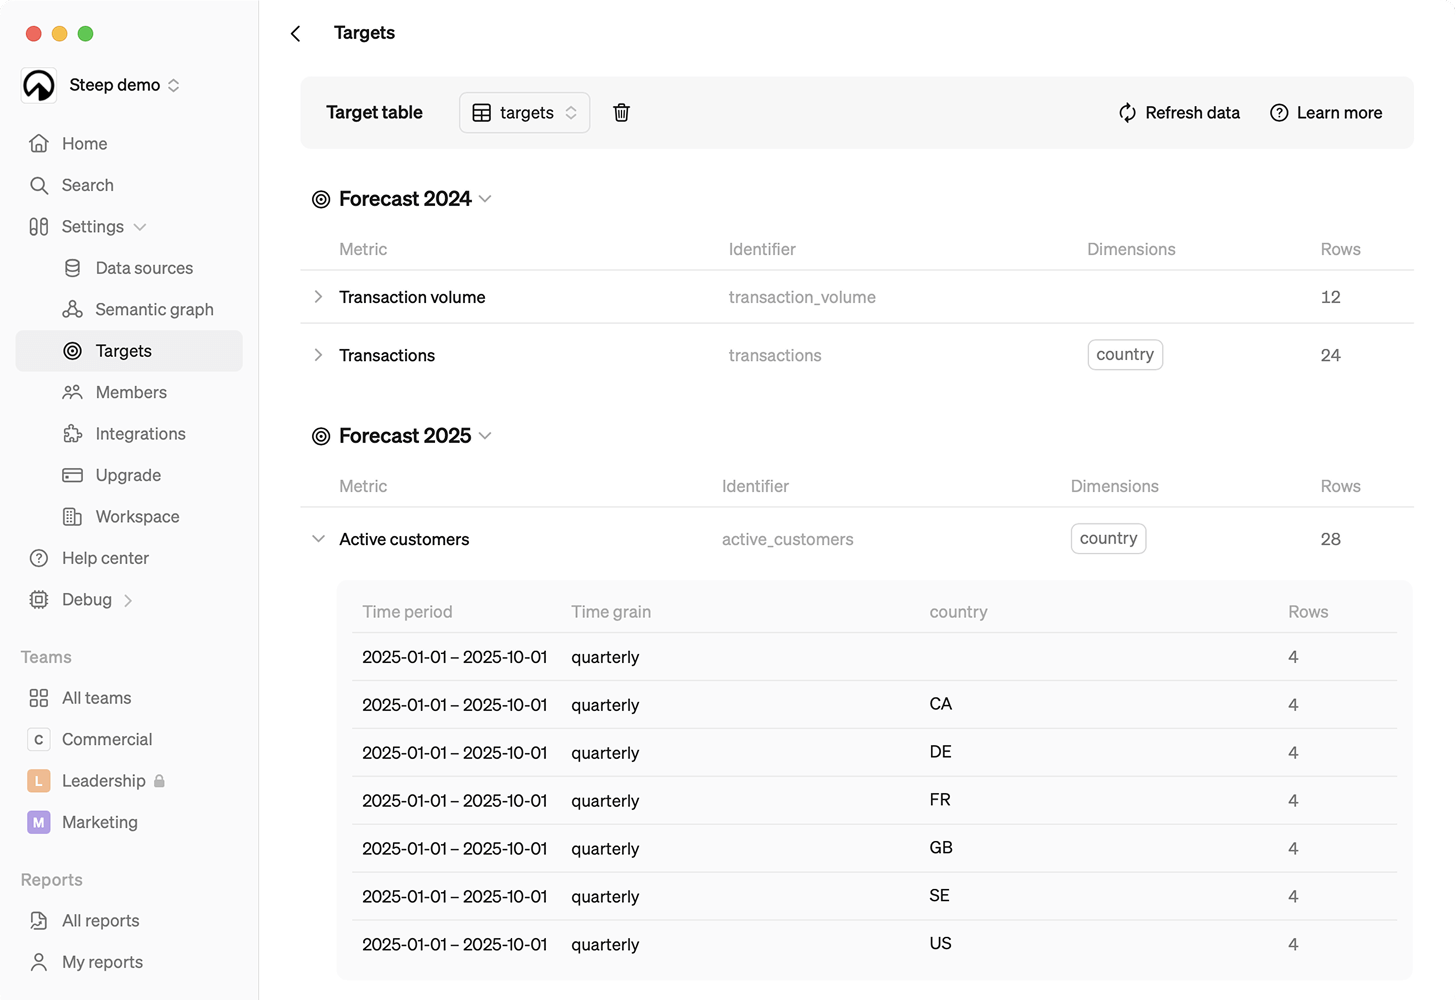
Previous target table format
Example:
| series | metric | time | value | dimension | dimension_value |
|---|---|---|---|---|---|
| Budget 2024 | registrations | 2024-01-01 | 10000 | ||
| Budget 2024 | registrations | 2024-04-01 | 12000 | ||
| Budget 2024 | registrations | 2024-07-01 | 15000 | ||
| Budget 2024 | registrations | 2024-10-01 | 20000 | ||
| Budget 2024 | registrations | 2024-01-01 | 1500 | country | US |
| Budget 2024 | registrations | 2024-04-01 | 1500 | country | US |
| Budget 2024 | registrations | 2024-07-01 | 1500 | country | US |
| Budget 2024 | registrations | 2024-10-01 | 1400 | country | US |
| Budget 2024 | registrations | 2024-01-01 | 2000 | country | DE |
| Budget 2024 | registrations | 2024-04-01 | 2000 | country | DE |
| Budget 2024 | registrations | 2024-07-01 | 2500 | country | DE |
| Budget 2024 | registrations | 2024-10-01 | 2500 | country | DE |
| Budget 2024 | registrations | 2024-01-01 | 1000 | segment | Women 25-40 |
| Budget 2024 | registrations | 2024-04-01 | 1100 | segment | Women 25-40 |
| Budget 2024 | registrations | 2024-07-01 | 1200 | segment | Women 25-40 |
| Budget 2024 | registrations | 2024-10-01 | 1300 | segment | Women 25-40 |